
When you start planning your trip to the U.S., one of the first hurdles is understanding the visa application process. The initial number you'll encounter is the main application fee, officially known as the Machine Readable Visa (MRV) fee. For most common nonimmigrant visas, like the B1/B2 visa for tourism or business, this fee is currently $185.
This payment is your entry ticket into the U.S. visa system. It's a mandatory, non-refundable charge that allows you to submit your application and schedule that all-important interview at a U.S. embassy or consulate. However, it's crucial for applicants from countries like Mexico, Colombia, or Brazil to know that this is just the starting point; other costs can arise depending on your specific situation.
The Real Cost of a US Visa Application
Thinking about the total cost of a U.S. visa is a bit like planning a road trip. That $185 MRV fee? That’s like the base price for the car rental. It's the absolute essential you have to pay just to get the keys and start your journey.
But anyone who's taken a road trip knows the rental fee is just the beginning. You still need to budget for gas, tolls, food, and maybe even a flat tire. The visa process is similar—for applicants, whether you're an Indian citizen residing in Canada or a Colombian national in Bogotá, other expenses will almost certainly come into play.
That initial fee covers the administrative side of things—the U.S. government's time to process your paperwork and interview you. It’s a fee for the service, not a guarantee of getting the visa. Keep in mind that whether you're approved or denied, that money is spent.
Understanding the Core Application Fee
The MRV fee is the bedrock of your visa budget. For applicants from all over the world, including the 40+ countries we support like Argentina, Kenya, and the United Kingdom, this is the very first financial step in the process. Its purpose is straightforward: to cover the cost of having a consular officer review your documents and sit down with you for an interview.
This infographic breaks down how the MRV fee fits into the initial stages of your application.
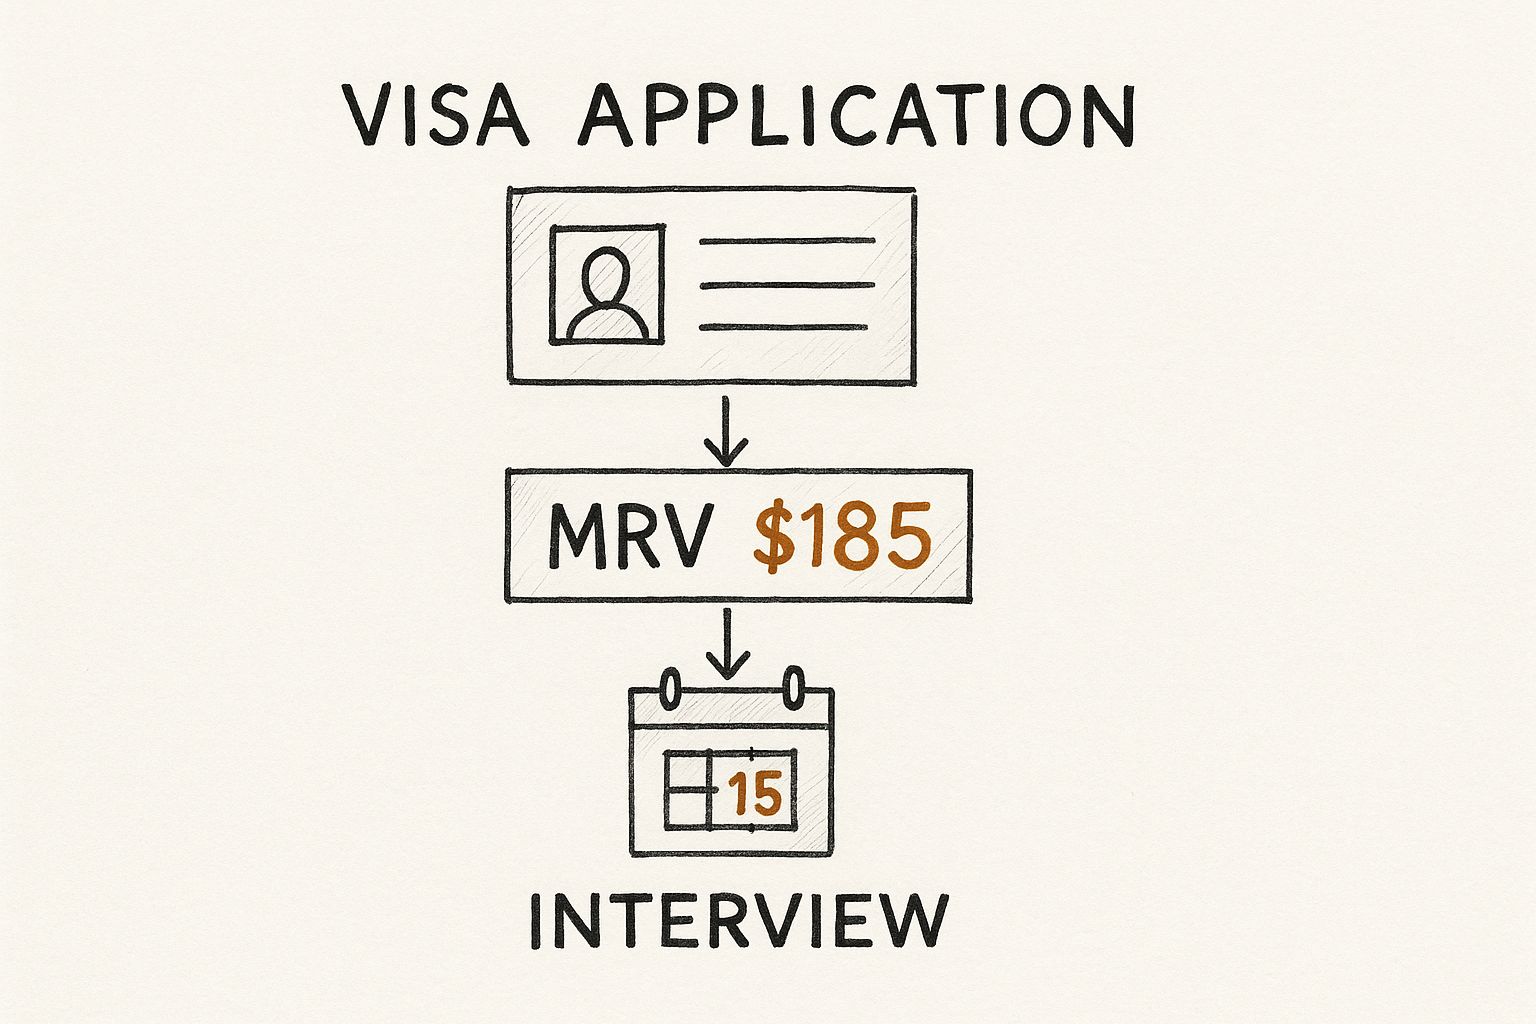
As you can see, paying this fee is what unlocks the next big step: scheduling your interview.
The price isn't set in stone, either. The U.S. Department of State periodically reviews its fees to make sure they actually cover the costs of providing these services. For example, the B1/B2 visa fee was $160 for over a decade before it was raised to $185 in June 2023. That 15.6% increase came after a review found that the operational costs had gone up. Other visa types saw even steeper hikes at the same time.
The most important thing to remember is that the MRV fee is non-refundable and non-transferable. Once you've paid it, there's no getting it back—even if you change your mind or your application is denied.
Here’s a quick look at the standard application fees for some of the most common visa types.
Common US Nonimmigrant Visa Application Fees
This table outlines the standard MRV fees for several popular nonimmigrant visa categories.
| Visa Category | Description | Application Fee (USD) |
|---|---|---|
| B1/B2 | Visitor: Business, Tourism, Medical Treatment | $185 |
| F, M, J | Student and Exchange Visitor Visas | $185 |
| H, L, O, P, Q, R | Petition-Based Temporary Worker Visas | $205 |
| E | Treaty Trader, Treaty Investor, Australian Professional | $315 |
| K | Fiancé(e) or Spouse of a U.S. Citizen | $265 |
These figures represent just the initial government processing fee, so be prepared for other potential costs down the line.
Beyond the Application Fee Itself
While the MRV fee gets most of the attention, don't let the other costs catch you by surprise. For instance, you can't even start a visa application without a valid passport, and getting one has its own price tag. We break down those specific charges in our guide on the total cost of a passport.
Think of it this way: a passport and other required documents are like your driver's license. You need to have it in hand before you can even think about renting the car for your trip.
Breaking Down Every Type of Visa Fee
Think of that standard $185 MRV fee as your entry ticket. It gets you in the door for an interview, but it's often just the first stop on your U.S. visa application journey. Depending on where you're from and the specific visa you need, other charges can pop up. Knowing what these are ahead of time is the key to building a realistic budget.
The most common "extra" charge you might encounter is the Visa Issuance Fee, which is also known as a "reciprocity fee." It’s a completely different animal from the MRV fee. While everyone pays the MRV fee upfront just to apply, the issuance fee is more like a success fee—you only pay it if your visa is actually approved.
The whole idea is based on what the name implies: reciprocity. If your home country charges U.S. citizens a fee to get a similar visa, the U.S. will turn around and charge a similar fee to citizens of your country. It's a "you charge us, we charge you" system.
Reciprocity Fees Explained
Don't assume this fee applies to you; it doesn't. Reciprocity fees are only for specific nationalities and certain visa categories. For instance, applicants from countries like Brazil or Nigeria often have to pay one, but someone from South Africa or Uruguay might not. The cost can be all over the map, too, from just a few dollars to several hundred.
Let's make the distinction crystal clear:
- MRV Fee: This is your non-refundable application processing fee. Nearly everyone pays it before their interview, whether the visa is approved or denied.
- Issuance Fee: You only pay this after your visa is approved. The amount depends entirely on what your home country charges Americans for the same kind of visa.
These fees can and do change, so it's absolutely critical to check the official U.S. Department of State's Reciprocity Schedule for your country before your interview. That's the only way to know for sure if a fee applies to you and exactly how much you'll need to have ready.
A classic mix-up is thinking the MRV and issuance fees are the same thing. Just remember: the MRV fee is for the service of applying, while the issuance fee is for the privilege of getting the visa sticker in your passport.
Petition-Based Visa Fees
Now, for most people applying for a B1/B2 tourist or business visa from places like Colombia, Mexico, or Kenya, this next part won't apply. But it's still good to know about. We're talking about petition-based fees.
These fees are tied to work visas—think H, L, or O visas—where a U.S. employer has to get the ball rolling by filing a petition with U.S. Citizenship and Immigration Services (USCIS).
Those petitions come with their own set of costs, and it's almost always the U.S. employer who pays them. Filing that initial paperwork is a completely separate financial step that happens long before the visa applicant ever steps into a consulate to pay their own MRV fee. This is a big reason why the total us visa application cost for a temporary worker can be so much higher than for a tourist.
If you're applying for a B1 visa for business, it's really important to make sure your planned activities don't cross the line into work that would require a petition. Our guide on business visa requirements for the US breaks down how to navigate that fine line. Having a full picture of the financial landscape, from reciprocity to petition costs, means no surprises along the way.
How to Pay Your Visa Application Fee Correctly
Knowing the cost of a U.S. visa is one thing, but actually paying the fee correctly is a whole different ballgame. This step can be surprisingly stressful, mainly because the rules change from country to country. The payment method for an applicant in Colombia, for instance, could be completely different from the process for someone in Kenya.
This is where you absolutely have to sweat the small stuff. One tiny mistake can lead to major delays, sometimes even forcing you to restart the payment process entirely. The golden rule? Treat the instructions on your local U.S. embassy or consulate website as gospel. They are the only source of truth that matters because they're tailored specifically to your country.
Finding and Following Official Payment Instructions
Your first and most critical move is to head straight to the official website of the U.S. embassy or consulate where you'll be applying. Look for their section on nonimmigrant visas—that's where you'll find the specific, non-negotiable instructions for paying the MRV fee. Don't rely on third-party sites or old forum posts for this information.
These official sites will point you to the right payment portal or designated banks for your region. For example, applicants in Mexico are often required to make a cash deposit at a Scotiabank branch. Meanwhile, someone applying in Ethiopia or Tanzania might be directed to a different local bank. In other places, like the United Kingdom or Brazil, the most common method is paying online with a credit card through the official application portal.
You'll typically find one of these payment methods available:
- In-person cash deposit: This usually means taking a specially generated deposit slip to an authorized local bank.
- Online payment: The most straightforward option, using a debit or credit card on the official U.S. visa services website.
- Electronic Funds Transfer (EFT): A direct bank transfer, though this is a less common option for most B1/B2 applicants.
Before you enter a single piece of payment information, triple-check that you're on a legitimate government-affiliated website. Look for the .gov domain to be sure.
Protecting Your Payment Receipt Number
Once your payment goes through, you’ll get a receipt. This isn't just a simple proof of purchase; it's the golden ticket that gets you to the next stage of your application. The receipt will have a unique number on it, sometimes called an MRV fee number or a transaction ID.
CRITICAL: Do not lose this receipt number. You absolutely cannot schedule your visa interview without it. It's the unique identifier that connects your payment to your DS-160 application form.
Think of it as a concert ticket. You can't get into the show without the barcode, even if you paid for your seat. The same logic applies here—no receipt number means no appointment. You can see exactly how this payment step fits into the bigger picture in our complete guide to U.S. visa appointment booking.
Guard this number carefully. Take a photo of it, save a digital copy, and tuck the physical receipt away somewhere safe. Losing it will only lead to frustrating delays while you navigate the bureaucracy to recover it, potentially pushing your application back by weeks.
Budgeting for the Real Cost of a U.S. Visa
That $185 MRV fee you pay upfront? Think of it as just the tip of the iceberg. While it's the main government fee for many visa types, the total us visa application cost is almost always higher once you factor in all the other expenses that pop up along the way. These "hidden" costs are easy to miss, but they can add up fast.
It’s like buying a ticket to a big game. The ticket gets you in the door, but it doesn't cover your travel to the stadium, parking, or the ridiculously expensive snacks inside. To really know what you're spending, you have to budget for the whole experience.
Creating a Complete Financial Checklist
A solid visa application isn't just about getting your paperwork right; it's about having a realistic financial plan. Let's walk through the common expenses you should be ready for.
Before you even start the DS-160 form, you’ll run into some initial costs:
- Passport Fees: No valid passport, no visa application. Simple as that. If your passport is expired or needs to be renewed, that’s your first expense.
- Visa Photos: Don't just snap a selfie. The U.S. government has very specific rules for visa photos—from the size to the background color. Going to a professional service that knows these rules is a small price to pay for peace of mind.
These are just the warm-up expenses. The real costs often come from preparing your documents and actually getting to your interview.
The High Cost of Travel and Logistics
For a lot of people, the single biggest surprise expense is travel. U.S. embassies and consulates are usually only in one or two major cities. If you live in a large country like Brazil, South Africa, or Peru, just getting to the consulate can be a serious financial challenge.
The journey to your interview is a major part of the overall cost. Factoring in transportation and a place to stay isn't a luxury—it's a critical part of a smooth application process.
Your travel budget needs to cover a few key things:
- Transportation: This could be anything from a bus ticket to a domestic flight to reach the city where your interview is scheduled.
- Accommodation: If your appointment is bright and early, you'll likely need a hotel for the night. This is especially true if you’re traveling a long way, maybe even with your family in tow.
- Local Transit: Don't forget the small stuff! You’ll still need to pay for a taxi or a subway ride to get from your hotel to the consulate on the big day.
Life happens, and sometimes you might need an earlier appointment than what's available. It's worth learning about the steps to expedite a US visa appointment and understanding how that could affect your budget.
Document and Administrative Expenses
Finally, there's a whole category of smaller administrative fees that can quietly add up. They might not seem like much on their own, but together, they make a real difference.
To help you get a clear picture, here’s a breakdown of common indirect costs you might face.
Checklist of Potential Indirect Visa Application Expenses
| Expense Category | Description | Estimated Cost Range (USD) |
|---|---|---|
| Passport Renewal | Fees charged by your home country's government to issue or renew your passport. | $50 - $200 |
| Visa Photos | Professional photo services that guarantee compliance with U.S. government specifications. | $10 - $25 |
| Document Translation | Certified translation of non-English documents (e.g., bank statements, birth certificates). | $20 - $50 per page |
| Photocopying/Printing | Printing the DS-160 confirmation, appointment letter, and copies of all supporting evidence. | $5 - $20 |
| Travel to Consulate | Cost of flights, trains, or buses to get to the city where the U.S. embassy or consulate is located. | $50 - $500+ |
| Accommodation | One or two nights in a hotel near the consulate, especially for early morning appointments. | $75 - $300 per night |
| Local Transportation | Taxis, ride-sharing services, or public transit to and from the consulate on interview day. | $10 - $50 |
| Courier Service | Mandatory fee for the return of your passport (with the visa) after a successful interview. | $15 - $40 |
By planning for these items from the start, you can build a budget that reflects the true cost and avoid any last-minute financial stress.
A Look at Immigrant Visa Costs
While this guide is all about temporary B1/B2 visas, it’s worth taking a quick detour to understand the financial side of long-term U.S. immigration. The difference is pretty stark.
Think of it this way: paying for a tourist visa is like booking a short-term rental. The cost is straightforward and covers your temporary stay. An immigrant visa, on the other hand, is like making a down payment on a house—it's a much bigger investment broken into several stages.
This distinction is key because the us visa application cost for immigrants is significantly higher and far more complex. The process ropes in multiple government agencies and requires fees at different milestones, which makes sense given the deep vetting involved in granting permanent residency. It’s a completely different financial roadmap than the one B1/B2 applicants follow.
The Key Financial Steps for an Immigrant Visa
Unlike the single MRV fee for a tourist visa, the path to an immigrant visa has several financial checkpoints. The main costs usually break down like this:
- Petition Filing Fee: It all starts here. A U.S. citizen or employer files a petition, like a Form I-130 for a relative, with U.S. Citizenship and Immigration Services (USCIS). This fee gets the ball rolling.
- NVC Processing Fee: Once USCIS gives the green light, your case moves to the National Visa Center (NVC). They charge their own fee to handle the application from there.
- USCIS Immigrant Fee: This is the last major fee. You pay it after your visa is approved but before you travel to the U.S. It covers the cost of actually producing your Green Card.
The fees are also tiered based on the type of application. For example, the processing fee for most family-based immigrant visas is $325 per person, while employment-based petitions cost $345. Other categories, like special immigrant visas, are set at $205 per person. It’s critical to know that these fees are non-refundable and must be paid before you can schedule your interview. You can check out the official fee schedule for various visa services for a complete breakdown.
By understanding this separate, more involved financial path, you can avoid confusing it with your current B1/B2 application. They are two different journeys with two very different price tags.
Knowing the difference helps manage expectations, especially if you have future immigration goals. For applicants from countries like Mexico or Colombia, understanding the consulate's role is crucial in both processes. You can get more details from our guide on the role of the United States consulate in visa processing.
Common Questions About US Visa Fees
Working through the financial side of a U.S. visa application can feel a bit like navigating a maze. It's totally normal to have a few questions left over. Let's clear up some of the most common things people wonder about when it comes to the us visa application cost.
What Happens If My Visa Is Denied?
This is probably the biggest question on every applicant's mind. If your visa application is denied after your interview, unfortunately, the Machine Readable Visa (MRV) fee you paid is not refundable.
It helps to think of this fee as a processing charge, not a payment for the visa itself. The fee covers all the work that goes into handling your application—from the U.S. government reviewing your DS-160 form to a consular officer taking the time to interview you. Because they've performed that service, the fee isn't returned, regardless of the outcome.
How Long Is My Payment Receipt Valid?
Your MRV fee payment receipt doesn't last forever. Once you pay, the clock starts ticking—your receipt is typically valid for one year from the payment date.
This means you have to schedule your interview appointment at a U.S. Embassy or Consulate within that 365-day period. If you don't book an appointment before the receipt expires, the payment is gone, and you'll have to pay the full fee all over again to move forward. It's a critical deadline to keep in mind as you plan out your application.
Here's a key detail: The one-year validity is for scheduling an interview, not necessarily attending it. As long as you book an appointment slot before your receipt expires—even if the actual interview date is more than a year away—your payment is still good.
Can I Transfer My Fee to Someone Else?
The short and simple answer is no. The MRV fee is strictly non-transferable.
When you make the payment, it's tied directly to your specific passport number and DS-160 application profile. You can't pass it along to a family member or a friend, even if they're applying for the exact same visa. If you change your mind and decide not to apply, you can't give that payment credit to another person.
Are There Any Situations for Fee Waivers?
While most applicants have to pay the fee, there are a few very specific, limited situations where a waiver is possible. It’s important to know that these are rare exceptions, not the general rule.
Fee waivers are typically reserved for a handful of visa categories, such as:
- A, G, C-2, C-3, NATO, and diplomatic visas, which are for official government business.
- J visas for people participating in certain U.S. Government-sponsored exchange programs.
- In some very specific cases, individuals traveling to provide charitable services, as determined by the Department of State.
For almost everyone applying for a B1/B2 tourist or business visa, a fee waiver just isn't an option. You should always factor the full, required MRV fee into your application budget.
Dealing with long visa appointment wait times can be just as tough as managing the costs. After paying your fees, the last thing you want is to wait a year for an interview. Vast Fisa helps you skip the line by monitoring for earlier appointment slots 24/7 and automatically rescheduling for you, turning months of waiting into weeks. Find your earlier U.S. visa appointment date.